
We understand that organizations everywhere are faced with canceling events and issuing refunds. Instead of immediately issuing a full refund for cancelled events, some organizations are asking registration owners if they’d like to convert all or part of their registration fees for canceled events to a donation instead. To contact all event registrants through Communications Center, follow these steps:
- Create a new message.
- When you’re ready to send it, click Add Recipients. A list of recipient options is displayed.
- Click From the Address List of Events and Donations.
- In the Organization menu, select the organization that contains the event.
- By default, the message will be sent to all registrants and registration owners. To limit the message to registration owners, select Only registration owners.
- Click Include.
- Complete and send the message as usual.
If you need to issue many refunds, please see this article for information about raising the daily refund limit for different payment processors.
As you know, we’ve launched a new customer support system that will make it easier and faster for us to respond to your questions and issues.
IMPORTANT: The first time you submit a help request or send any kind of email to support@doubleknot.com, you’ll receive an email asking you to verify your email address. You must follow the steps in this email for your message to enter the system. If you don’t open the email and click the link to verify your email address, we will not see your message.

If you need to reschedule an event, follow these steps:
Reschedule the Event?
- On the management page for the event, click Edit.
- Change the event dates. Don’t forget to change the registration end date and the end date for changing registrations.
- Save your changes.
Inform Registrants
To inform registrants about the new date and time, follow these steps in Communications Center.
- Create a new message.
- When you’re ready to send it, click Add Recipients. A list of recipient options is displayed.
- Click From the Address List of Events and Donations.
- In the Organization menu, select the organization that contains the rescheduled event.
- By default, the message will be sent to all registrants and registration owners. To limit the message to registration owners, select Only registration owners.
- Click Include.
- Complete and send the message as usual.
If you need to cancel an event and issue refunds, follow these steps.
Cancel the Event
- On the management page for the event, click Edit.
- In the Description field, add “Cancelled” to the name of the event so that it will display on calendars as cancelled.
- Scroll down to the Online Registration Details section.
- Change the Registration End Date to yesterday.
- Save your changes.
Issue a Refund
- On the management page for the event, click Manage Registrations.
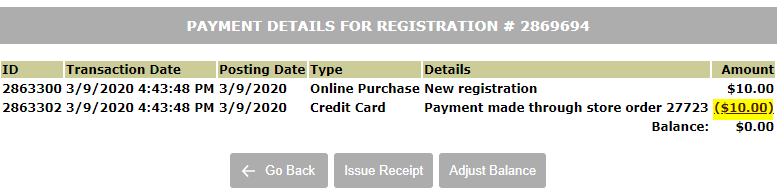
- At the right of the first registration, click the three-dot menu and select View Payments. The Payment Details page is displayed.
- Click the hyperlink for the payment (highlighted in the following image). The Transaction Detail page will be displayed.
Click the hyperlink for the purchase amount (highlighted in yellow in this image) to display the Transaction Details page.
- At the bottom of the Transaction Detail page, click Issue Refund. The Issue a Refund page is displayed.
- In the Amount to Credit field, enter the amount of the refund.
- In the Reason for Credit field, enter the reason (e.g., “Event cancelled”).
- In the Credit Amount field for the cancelled event, enter the amount of the refund.
- Click the checkbox that authorizes processing the refund.
- Click Refund. The Credit Request Confirmation page is displayed.
- Click Done. The Transaction Details page is displayed.The refund has been issued and an email is sent to the registration owner to let them know their money was refunded.
- Click Done. The Payment Details page is displayed.
- Click Go Back. The Manage Registrations page is displayed.
Delete the Registration
- For the registration you just refunded, click the three-dot menu and select Delete Registration. The Delete Warning page is displayed.
- Click Delete. A confirmation dialog will be displayed.
- Click OK. The registration will be deleted, the balance for the registration will be adjusted to $0.00, and the only available items in the Action column will be View Detail and View Payments.

If your organization uses Togetherpay and needs to issue refunds in excess of the default limit of $5000/day, please contact Support immediately at Support@doubleknot.com or (408) 971-9120 x2. We will update your daily refund limit to meet your needs. (If you email us, please follow the instructions earlier in this newsletter to verify your email and ensure we receive your message.)
If your organization uses Authorize.net or Worldpay, you’ll need to contact them directly to raise your daily refund limit.
|

